Random Nudges

I have added a new feature to the Inkscape extensions for bobbin lace. You can now jiggle the patterns about by small random amounts.

After updating your Inkscape bobbin lace extensions, you will see a new area at the bottom called “Optional effects”. Here you can choose how much you want to jiggle the pattern around as a percentage of the distance between footside pins.

You can jiggle the pattern in just the x-direction, just the y-direction or both. For example:

Examples of randomly jiggling various patterns

One thing this feature brings to mind is an interesting circular Moiré pattern that creates a sense of order from a random distributions of dots. As shown in the following YouTube video, Tadashi Tokieda calls them “Freaky dot patterns”:

I am curious whether we can get a similar effect in lace. You could create two layers of lace, each from the same randomly jiggled pricking, and rotate one layer on top of the other. Overlapping two randomly jiggled prickings of a diamond net gives the figure below which would make an interesting kinetic lace piece. Notice the suggestion of concentric circles as described by Tokieda.

Similarly, a Moiré effect created by rotating two regular diamond ground prickings gives the result in the following figure. Because the regular pattern repeats periodically, the interference pattern also repeats periodically.

I will update this post when I have had a chance to experiment with these Moiré effects in lace. My prediction is that a highly symmetric stitch, such as Torchon ground, will give the best result.

Labyrinths and space-filling curves

Labyrinths

A labyrinth is a single path that twists around and fills a shape.  Examples include the circular path at Chartres Cathedral in France and the rectangular El laberinto del patio by Ernst Kraft in Málaga, Spain.  The Labyrinth society has provided a website for locating a labyrinth close to you. Jo Edkins, known to many lacemakers for her online lace school, has written an excellent summary on the History of mazes and labyrinths.  Her website includes instructions for constructing several designs.  Lars Howlett, a designer of labyrinths, has created a wonderful set of design tutorials on his website.

Labyrinths appear frequently in bobbin lace patterns.  Pat Brunsdon and Michele Minguin-Debray have designs based on the labyrinth at Chartres.  Christine Mierecki and Barbara Corbett both feature a square labyrinthine layout on the cover of their Milanese lace books.  The most prolific source is Hinojosa tape lace, such as this fabulous ring by Carolina de la Guardia.  Most Hinojosa patterns are comprised of a single tape that winds around with wonderful symmetry and sensitivity to form. The tape completely fills the shape, often with an elaborate outline.

Besides finding labyrinths visually beautiful, we associate spirituality and introspection with the act of tracing their path.  As you get turned around on the convoluted journey, you lose reference to the outside world. Your focus naturally turns inward to your own purpose and meaning.  This form of meditation is very familiar to lace makers.

Space-filling curves in Math

Mathematicians are also interested in these convoluted paths.   You may recall that a line has one dimension. A solid square is a two-dimensional object and a solid cube is a three-dimensional object.  Mathematicians in the 1800s wanted to know whether it is possible to draw a line that is so convoluted that it completely fills a square.  If so, does the line have one dimension or two, or perhaps something in-between?

In 1890, Giuseppe Péano, from the University of Turin, presented the following answer:

Divide a square into nine smaller squares.  Trace a single path that visits every one of the nine squares without crossing itself as shown in Figure 1a.  We will call this “path N”.  Number the nine squares in the order they are visited by path N (see Figure 1a).

Now subdivide each of the nine squares into nine smaller squares for a 9×9 grid of 81 small squares.  Our next goal is to place a copy of path N in each small square in such a way that the paths connect to form a single line.  Start by placing a copy of path N in the bottom-left square (see Figure 1b). Next place a copy of path N in the middle-left square.  Since we want to connect the two paths together with the shortest possible line, the second N must be flipped.  The first path N ends on the right. Once flipped, the second path N starts on the right and the points we need to connect align.

Continue adding N paths, flipping as required and following the order one to nine, to complete the pattern as shown in Figure 1c.  Repeat this process a third time to get the pattern shown in Figure 1d, on a grid of 729 very small squares.

peano

Figure 1: Creating a Péano curve: (a) First iteration, draw a basic path through 9 squares. (b) Second iteration, subdivide each square in Figure 1a into nine smaller squares. Draw a copy of path N in block one and a flipped copy in block two. (c) Repeat to complete the pattern. (d) Third iteration, subdivide each square in Figure 1c into nine smaller squares and repeat the process starting at the bottom left corner.

With each pass, the path becomes more convoluted and visits more points in the square.  If you repeat this subdivision process an infinite number of times, the journey will take you to every point in the square.  Therefore, given infinite time, you can draw a two-dimensional line!

For design purposes, the Péano curve does not have to be limited to a square space.  When curved into a circle, we end up with something similar to the labyrinth at Chartres (see work by Marie-Pascale Corcuff).

chartres

Figure 2: a) Labyrinth at Chartres, source: http://commons.wikimedia.org, b) First part of Péano curve bent around a circle.

Over the years, mathematicians have discovered additional examples of what they call “space-filling curves”, some of which are shown in Figure 3.  Each of these patterns can be made more and more detailed by a repetitive process.  In a future post, I will provide a tutorial on how to generate these fractal designs with Inkscape.

spacefilling

Labyrinths and space-filling curves in Torchon designs

Convoluted paths are also useful in Torchon for creating large pieces, such as shawls or scarves, using a small number of bobbins. For a rectangular Torchon piece, such as the example in Figure 4, the number of bobbins required can be reduced by half using the following technique:

  1. When designing the piece, choose a ground with 45º reflection symmetry to lie at each corner.
  2. Work the right half of the lace from the top down to the reflection line through the bottom right corner.
  3. Rotate your pillow 90º counter clockwise and continue working to the next reflection line.
  4. Rotate your pillow once more and work back to the top. Along the inside edge of this last section, sew the new work to the previous work.

torchon sewing pattern

Figure 4: An example Torchon pricking and pair diagram.  The pattern is rotated at red dashed lines. Line colours in pair diagram indicate which stitches are made before turning.  Red pinholes indicate sewings between yellow and blue sections.

If the ground uses symmetric stitches (stitches that look the same when turned 90º), the pattern will appear uniform, as if it has been worked in just one direction.  For very large pieces, you can use spirals, zigzags or a labyrinthine path to reduce the number of bobbins even further. For the pattern shown in Figure 5, I used the Hilbert space-filling curve (3rd iteration) to reduce the number of bobbins in the ground section from 64 pairs to eight pairs.

In her trilogy Discover,Explore,Master Torchon, Ulrike Voelcker describes this technique in more detail.  She provides several layouts [p. 123-20] including the top left corner of the “Wunderlich 1” pattern shown in Figure 3.  Voelcker also provides instructions [p. 117] on how to join two halves of a stitch with a nearly invisible sewing.

hilbert-curve_cropped

Figure 5: Hilbert space-filling curve as lace (high resolution image). Instructions on how to work this pattern will appear in Vuelta y Cruz/ Twist and Cross issue No. 29. On sale in August 2020.

If we only use one colour of thread, the labyrinth outline will disappear in the finished lace; only the lacemaker will know about it.  However, we can take advantage of the convoluted path and turn it into a design element by using two colours of thread: bobbins on the left side of the “tape” will hold colour A; bobbins on the right will hold colour B.  To keep colour A threads on the left,  use a turning stitch (C pin TTC) whenever a colour A pair and colour B pair meet.

The TesseLace ground used in Figure 5, was generated by my computer algorithm.  The pricking, working and thread diagrams in Figure 6 show how it is worked.  While a little more complicated than Rose ground, this TesseLace ground also has 45 degree symmetry.

thread-diagram

Figure 6: TesseLace ground (a) pricking, (b) working diagram (green intersections worked as Twist-Cross, rose intersections worked as Cross), and (c) thread diagram.

You can play with the crosses and twists used in this ground pattern by going to GroundForge – Diagrams of bobbin lace patterns.  Follow the instructions for modifying stitches.  I will write more about this useful ground exploration tool in a future post.

Update

In August 2020, I taught a virtual workshop on these space-filling curves and labyrinths through the Lace Museum. One of the participants, Elizabeth May, designed the following spiral piece.

Spiral design in Rose ground by Elizabeth May

Spiral design in Rose ground by Elizabeth May

Fibonacci, quasiperiodic patterns and design

An abridged version of the following article appeared in the Bulletin OIDFA (Quarterly Journal of the International Bobbin and Needle Lace Organisation), 2020 No. 1.

When I design a pattern for bobbin lace, I turn to mathematics for creativity and inspiration.  In this article, I want to share a story of what this looks like.

One dimension

Imagine you are holding a lace edging that is several meters long.  When looking at the lace, you can find different spots that look the same.  Place your finger on one of these spots and ask a friend to place their finger on another.  Now compare the edging under your fingers as you both travel along the lace in the same direction and at the same speed.  You will see that the lace under your finger is always the same as the section under your friend’s finger until one of you reaches the end of the edging.  If the lace were infinitely long, you could keep doing this forever.  The lacemaker might have made a few mistakes or improved their technique over time so real lace is rarely exactly the same everywhere.  However, you can still see how they repeatedly worked the same pattern to create the yardage.

In math, a design that repeats by sliding the pattern in one direction is called a “frieze”, named after the frieze decorations found in architecture.  The motion of sliding is called a “translation” and the distance the pattern must slide to line up for the next repeat is called its “period”. Frieze patterns are periodic patterns in one dimension, so called because you slide the pattern one direction.

In Figure 1, you can see the pattern for a Torchon edging with diamond-shaped areas.  Some diamonds contain Rose ground (I have labelled them ‘A) and others have spiders (which I have labelled ‘b‘).  The diamonds repeat in the pattern AbA.

fig1_periodic_frieze

Figure 1: A traditional periodic Torchon lace edging

Does a pattern have to be periodic to repeat?  No!  Like the repetition of fallen leaves under a tree or birds soaring in a flock, you can create a design that repeats but not in the rigid way of a periodic pattern.  One way to do this is to use randomness.  For example, you could choose the order of the spiders and Rose ground by flipping a coin, heads means ‘make a spider’ and tails means ‘use Rose ground’.  If you make a long enough length of this edging, half of the diamonds will be A’s and half will be b’s but you could get runs of A’s and runs of b’s that are fairly long.  What if you would like to preserve the order AbA?  This is where a famous story from mathematics comes to mind: the problem of counting how fast rabbits multiply in ideal conditions.

In the 12th century, a mathematician, known as Fibonacci, imagined a reproduction rate for rabbits that went like this: you start with a pair of baby rabbits, one male and one female.  After one month the babies mature to adults.  By the second month, this adult pair gives birth to a new pair of babies, again one male and one female.  Their offspring also mature in one month and begin breeding in two months.  This cycle repeats month after month for all the descendants. (Aside: This ideal model leaves out many messy details such as death or two babies of the same sex. Simplifying a problem to make it solvable is something that is very common in math. )

To simplify things, I will use ‘b‘ to label a pair of baby rabbits and ‘A‘ to label a pair of adult rabbits.  The pattern of growth that Fibonacci described can be represented by a “substitution rule”: When a pair of baby rabbits reaches adulthood, we say “b becomes A”.  When two adults give birth to a new pair, we represent this as “A becomes Ab”.  This is what the first few generations would look like:

Day 0:                   b
1 month:              A
2 months:            Ab
3 months:            AbA
4 months:            AbAAb
5 months:            AbAAbAbA
6 months:            AbAAbAbAAbAAb
7 months:            AbAAbAbAAbAAbAbAAbAbA
and so on …

If we count how many pairs of rabbits we have each month, we get the famous Fibonacci sequence of numbers: 1 1 2 3 5 8 13….  Each number (except for the first two) is the sum of the previous two numbers (e.g., 13 = 5 + 8).

OK, that is interesting but what does it have to do with designing lace?

Mathematicians call a sequence of symbols a “word”.  For example, the sequence of A’s and b’s that we used to describe the rabbit population is a “Fibonacci word”.

Look at the Fibonacci word for the 7th month.  You can see that the pattern AbA repeats many times.  Sometimes, like at the beginning of the word, two copies are side by side (AbA AbA) and sometimes, like at the end, two copies overlap (AbAbA).  Mathematicians have proven that a Fibonacci word never has two b’s in a row or three A’s in a row.  Also, the pattern will never repeat periodically.

We can use the Fibonacci word to choose what to put in each diamond of our lace edging, as shown in Figure 2.  Now if you and your friend trace this edging, starting from two spots that look the same, at some point there will be a difference between what each of you is looking at.  Mathematicians call this kind of repetition “quasiperiodic” or “almost periodic” which means that a pattern (AbA in our example) appears repeatedly, but the larger piece cannot be created by sliding a pattern along with a regular period.

fig2_quasiperiodic_frieze

Figure 2: The beginning of a quasiperiodic Torchon lace edging that uses the Fibonacci word

You can also use the Fibonacci word to place tallies on Torchon ground.  In Figure 3, I assigned each symbol from the Fibonacci word to a crossing of pairs.  Going from left to right: if the symbol was A, I left the original crossing; if the symbol was b, I placed a red square to represent a tally.  When I arrived at the end of a row, I continued from the left on the next row.  A similar approach can be used to arrange snowflakes in a Binche design.

fig3_tallies

Figure 3: An arrangement of tallies based on the Fibonacci word

As a Fibonacci word gets longer, the ratio of A’s to b’s gets closer to the Golden Ratio.  This magical ratio is often associated with beautiful proportions.   The Fibonacci word is only one of many that belong to a family called the Sturmian words.  This family also includes the Tribonacci (three different letters) and Thue-Morse words.   Any of these words can be used to design lace.

Two Dimensions

But the story doesn’t end there.  Let’s take a look at bobbin lace grounds, which are also patterns that repeat many times in our lace designs.  To fill a shape in our design, we slide the ground pattern in two directions.  In mathematics, a pattern that repeats in two directions is called a “wallpaper” pattern.  We can also find wallpaper patterns in printed fabrics, tiled floors, and brick walls.

Now the interesting question is: Can we design a bobbin lace ground that is not periodic but still contains many copies of the same pattern? The answer is: Yes, we can!  Two more families, from the many two-dimensional quasiperiodic patterns known to mathematicians, will now join our story.

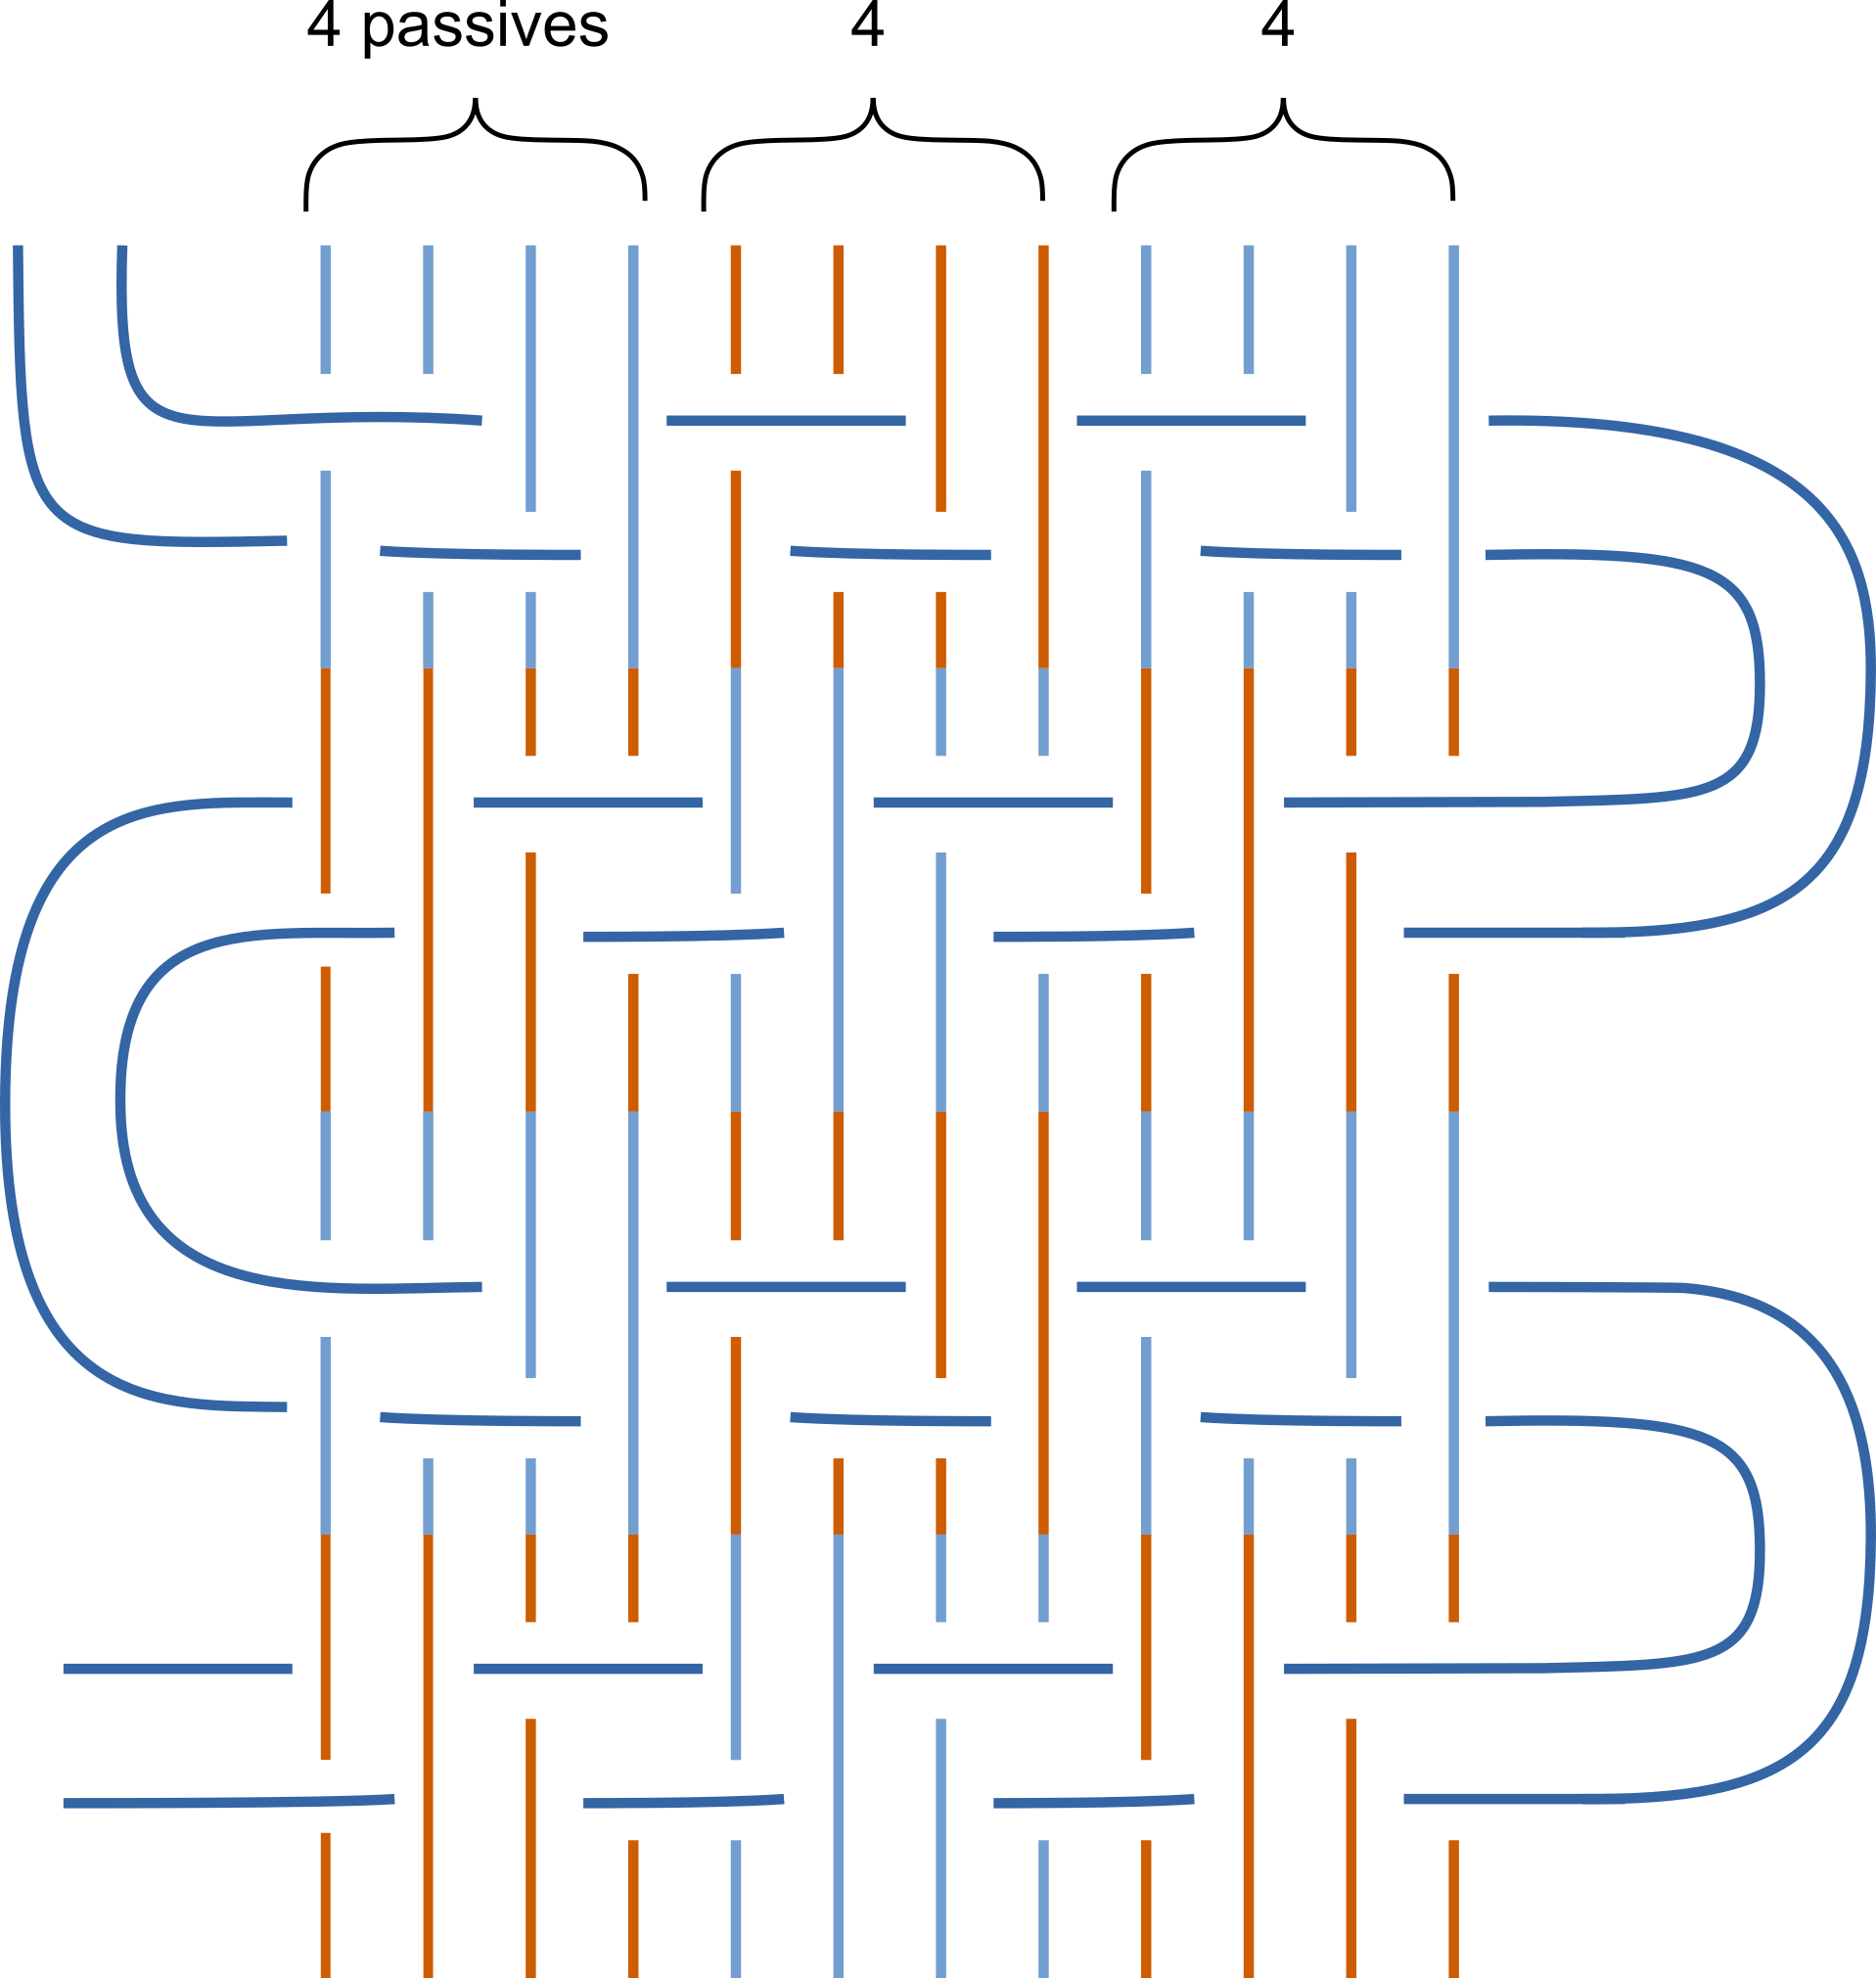
First, let me introduce the Ammann bar family.  These patterns are like the half-stitch ground (also known as triaxial weave).  In half-stitch ground, the cross-twist stitch weaves threads in three directions.  Each set of parallel threads is at a 120 degree angle to the other sets.  In the 1970s, a mathematician named Robert Ammann noticed that you could arrange five sets of parallel lines in an interesting pattern, shown in Figure 4.  For each set of parallel lines, Ammann used the Fibonacci word to determine the distance between lines.  He used ‘A’ for a long distance and ‘b’ for a short distance.

fig4_ammann_bars

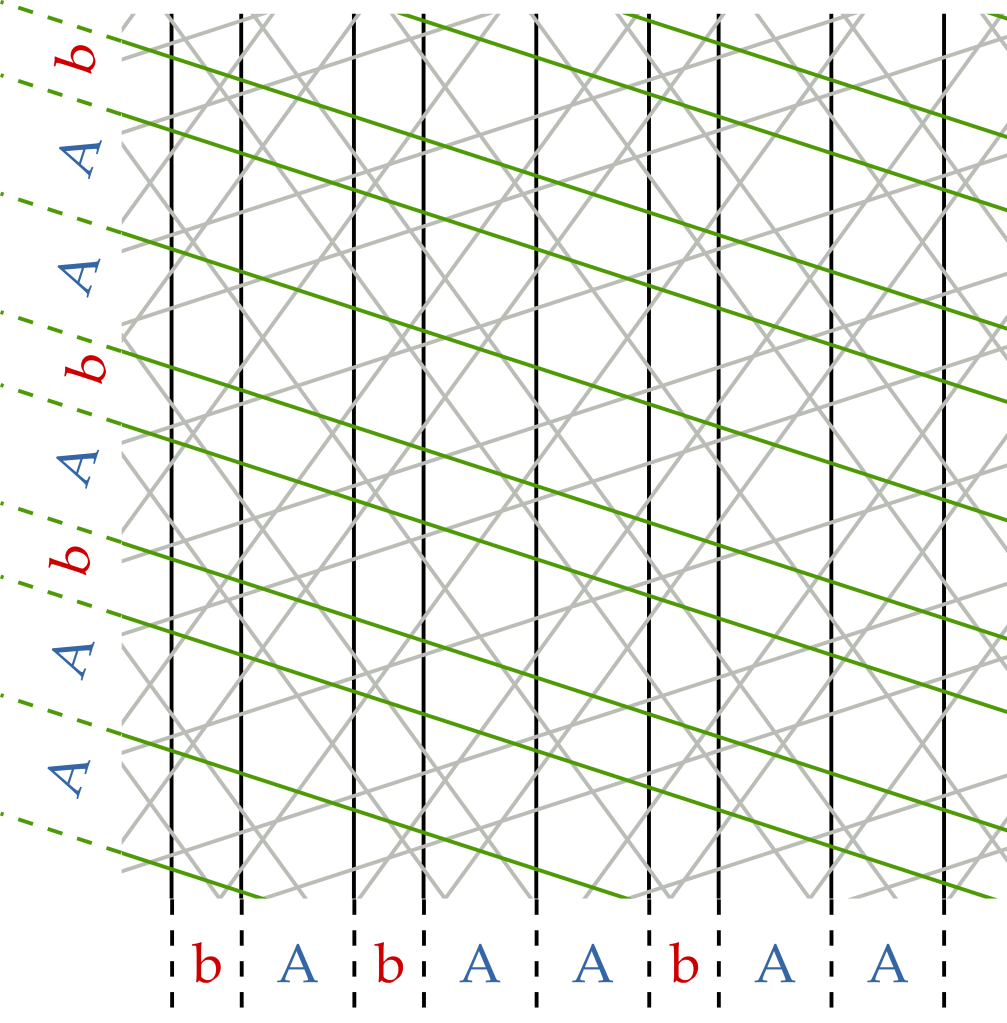
Figure 4: Ammann bar pattern with 5 sets of lines.  Two of the sets are highlighted, one in green and one in black.

In the lace shown in Figure 5, I worked one line from each set with pink thread.  Where the five lines come together, they form a pentagram (which is inside a pentagon inside another pentagram inside …).  Other patterns in the Ammann bar family have four or six sets of parallel lines.

small_fig5_ammann_bar_lace

Figure 5: Ammann’s web: lace made from the pattern in Figure 4 by Veronika Irvine

The second family, called the quasiperiodic rhomb tilings, contains the popular Penrose tiling.  A rhomb is a shape with four sides that are all the same length.  Like the Fibonacci words, a substitution rule is used to fit the rhombic tiles together in a quasiperiodic pattern. Figure 6 shows the Ammann-Beenker tiling.

fig4_ammann_beenker

Figure 6: Ammann-Beenker tiling in grey with lace pattern marked in red

In this figure, look at the corner of a rhomb and count how many line segments meet at that corner.  In many places, this gives an odd number. As lacemakers, we would prefer to have 4 line segments to meet at every corner because this corresponds to two pairs of threads coming together to make a stitch then going apart. So we can’t make lace directly from these beautiful patterns.  However, there is an easy way to convert a pattern made of rhombs into a lace pattern.  To start, place a dot at the center of every rhomb.  For each rhomb, draw lines from the dot at its center to the dot at the center of every rhomb that it shares a side with (see the red lines in Figure 6). Because a rhomb has four sides, there will always be four line segments connecting this dot to the other dots.  In Figure 7, you can see the resulting lace pattern.  Notice that it contains many copies of the same pattern (see blue highlights).  I have worked this pattern using a grand Venetian cord (yellow threads) for some of the stitches to emphasize the repeating elements.  You can explore many more rhomb tilings in the Tiling Encyclopedia.  With three pair crossings and four pair crossings, you can also turn patterns with hexagons or octagons into lace using the same trick.

fig5_ammann_beenker_lace_pattern

Figure 7:  Lace pattern derived from the Ammann-Beenker tiling

small_fig8_ammann_beenker_lace

Figure 8: Nodding bur-marigold: lace worked from the pattern in Figure 7 by Veronika Irvine

As you can see, math provides valuable tools for creative design. For more information on the concepts that I have presented here, please read my mathematical article on quasiperiodic bobbin lace grounds.  If you would like to see more of the patterns I have created using these and other mathematical principles, please visit my tools section.  You will find free patterns to download and use in your own creations.  I would love to hear about any lace you have made using math.

References

“The Fibonacci sequence: A brief introduction” by  Rachel Thomas
https://plus.maths.org/content/fibonacci-sequence-brief-introduction

“The golden ratio and aesthetics” by Mario Livio
https://plus.maths.org/content/golden-ratio-and-aesthetics

“The Mysterious Mr. Ammann” by Marjorie Senechal
http://www.squaring.net/downloads/ammann-senechal2004.pdf

“From quasicrystals to Kleenex” by Alison Boyle
https://plus.maths.org/content/quasicrystals-kleenex

Tilings Encyclopedia
https://tilings.math.uni-bielefeld.de/substitution/

“Quasiperiodic bobbin lace patterns” by Veronika Irvine, Therese Biedl, and Craig S. Kaplan
https://tesselacedotcom.wordpress.com/research/quasiperiodic-bobbin-lace/

Bobbin Lace Ground Dialog

Inkscape 1.0

Inkscape 1.0 was released in May, 2020.  It includes a long list improvements and new features. Specific details can be found in the release notes.

For lacemakers, I will point out two significant improvements:

  • Native support for Mac OS X.  The install process is much easier and the tool now looks and behaves like other Mac OS X tools.
  • Performance when working with a large number of objects has been improved.

To get started, download and install Inkscape 1.0.

The Bobbin Lace extensions must also be reinstalled for Inkscape 1.0. Open Inkscape 1.0 and take note of the folder listed at Edit > Preferences > System: User extensions.  Download extensions.zip  and extract the files into the “user extensions” folder. Close and re-open Inkscape. For more detailed instructions on how to install and use this tool, please visit my tools page.

In addition to upgrading to Inkscape 1.0, a few improvements have been made to the bobbin lace tools:

  • You can select a template file using a dialog (you no longer need to type in a long, difficult to find, file path)
  • The dialogs have been reorganized to be more compact and user friendly.
  • Choosing a colour is now simple.
  • Distance measurements are more accurate.

Bobbin Lace Ground Dialog

New bobbin lace ground dialog

2/2 twill with bobbins

Twill variations
Several twill patterns worked with bobbins.

Plain woven cloth (C T C) and tri-axial weave (C T) appear frequently in bobbin lace motifs. The key to these weaving patterns is that they can be made in a two-by-two grid. In plain weave, two worker threads weave through two passive threads giving the four threads at a time that bobbin lacemakers usually work with. This week on the Arachne news group, Joseph Young asked whether lacemakers have tried any other weaving patterns: https://www.mail-archive.com/lace@arachne.com/msg53321.html

This question intrigued me so I decided to give 2/2 twill a try using the usual bobbin lace techniques.

The twill pattern requires a four-by-four grid to get a full repeat so I tried weaving two worker threads though four passive threads, that is working with 6 threads (three pairs) at a time.

overview

Within these six threads, you can treat two threads as if they are one (as is sometimes done in lazy crossings) so that you can still use a modified cross and twist action.  Here is how I broke down the steps for one repeat:

Steps

Weaving from left to right:

l2r

When weaving from right to left you need to change the actions just a little bit to complete the second half of the pattern:

r2l

Notes:

If you do not have a multiple of 4 passives, you will have 2 extra passives on each row. Do a regular cloth stitch (C T C) through these two threads at the beginning of the left to right row and at the end of the right to left row.

If you do not add a footside or connect the twill to some other ground or cloth area, you will need to twist the workers a few times at the end of each row (not shown in diagram) or the worker threads will slide past the passive threads at the left edge.


Reversing the twill direction

You can also change the direction of the twill. Instead of the horizontal bars heading south-east, you can make the bars head south-west.

reverse

This can be easily done by modifying the first two steps from before:

reversel2r
reverser2l

Other variations

You can also combine south-east and south-west patterns to create more complicated designs such as diamond twill. Using one colour for the passives and another colour for the workers should make the twill pattern stand out.

Examples

I have worked a few variations on a 2mm x 2mm grid using 60 DMC Cordonet Special thread. Left to right: Several rows of SW, several rows of SE, diamonds, zigzags, adding twists on the passives, plain weave. The plain weave serves as a comparison for density. I added a twist to pairs of passive that were both sitting on top of the worker thread which resulted in ‘x’s in the colour of the passive thread

I was able to work the twill sections almost as quickly as the plain cloth section, once I got into the rhythm.

Several twill patterns worked with bobbins.

As Gabriele mentioned on Arachne (https://www.mail-archive.com/lace@arachne.com/msg53323.html), the threads in twill can slide around, much more than for plain weave. When the piece was finished, I pushed on the cloth with my thumb to see how stable it was. It took a lot of pushing to disturb the plain weave but the twill distorted with very little effort. The first two sections, worked in all SW or all SE, were the most stable, the diamonds were the most unstable. I think the more passive threads that the workers skip over, the weaker the material will be. If I were to use this technique in a lace piece, I would make the rows closer together (probably 2mm x 1.5mm for the sample above) and I would use a thread that is not slippery.

Creating tapes

Tape

Step 1) Draw the path that the tape follows

There are many ways you can draw a path in Inkscape.  In the example shown here, I have used the spiral tool, the freehand pencil, and the Bezier pen.  At the end of this post, I will discuss additional options.

In this example, I started with the spiral tool.  Select the spiral tool  (spiral icon.png) from tool icons along the left side of Inkscape.  You can adjust the appearance of the spiral with the options along the top of the Inkscape window (see red box below).  For information about each of the values that you can change, take a look at Tav Mjong’s Shapes and Spirals Chapter or the FLOSS manual. In the main drawing area, click and hold down the left button on your mouse and drag the mouse to create the spiral on the canvas.  When you have the right size, release the mouse button.

1 Spiral

I drew the rest of the heart, using the freehand pencil tool.  Select the pencil icon (pencil.png) from the left side of the Inkscape window.  You can adjust how the pencil draws using the options along the top of the window.  I used the “Regular Bezier Path” mode and increased the “smoothness” to 58 so that, even though my hand shakes a bit when dragging the mouse, the line is smooth.  To find out more about the different modes and settings,  have a look in  Tav Mjong’s Creating Paths Chapter.  Click and hold down the left mouse button and drag the mouse to draw your curve.  When you are done, release the mouse button.   Don’t worry if it is not perfect; you can change the line after you let go of the mouse.  I will show you how later on in this tutorial.

Note: If you are going to do a lot of freehand drawing, you might want to consider getting a graphics tablet.

1 Freehand line

We now have a spiral and a curve but, for drawing the zigzag pattern, we need them to be connected together.  Select both the spiral and the freehand curve.  To do this, click on the Select and Transform tool (select.png).  To select more than one object, you can hold down the Shift key and click on each object, alternatively, you can click and drag the mouse to create a box around both objects (Note: no part of the object can be outside the box).  You should see a dashed box around both objects.

From the top menu, select Path -> Combine.  Now you should just see one box around both items.

1-combine-freehand-and-spiral.png

Step 2) Edit Path

Now we can modify the path to get rid of any wobbles.

Select the Edit Path by Nodes tool (edit nodes.png). When you select a path, it will display little gray squares or diamonds along the path – these are called nodes.  The nodes control the appearance of the path.  You can change the position of a node by clicking on it and dragging.  You can also change how much the path curves by clicking on a node and pulling on the two little whiskers that appear by the node node.png. You can also add or remove nodes as well as many other options, too many for me to explain in this tutorial.  I recommend having a quick look at Tav Mjong’s Path Editing Chapter or in the FLOSS manual.

1-edit-points.png

Step 3) Add zigzags along path

Now that you have the path that you want the tape to follow, it is time to add nicely spaced zigzag lines showing where to put the pins.

The first step is to create one copy of the “zig” (or is it a “zag”?).  I used the Bezier pen tool to do this.  Start by selecting the pen tool (Bezier.png). To create lines with this tool, click and release the left mouse button at each point in the path you are drawing.  A straight line will join the nodes together. To finish the path, double click.  You can find out more about the Bezier pen tool from Tav Majong’s: Creating Paths Chapter or the FLOSS manual.

To create the zig, draw an upside down V shape (see below).

2 zigzag A.png

To make sure the Λ is perfect, we can edit the nodes using the alignment tool:
First, select the path editing tool (edit nodes.png).  Next, select Object -> Align and Distribute from the top menu bar of Inkscape.  This will open a little toolbox on the right side of the Inkscape window.  Click on the Λ  to select it.  Drag your mouse to select the two  little grey boxes at the bottom of the Λ.  The boxes should turn blue.  Click on the “align to horizontal line” icon (see below) to make the two points line up.

2 zigzag B

Now drag your mouse to select all of the boxes in the Λ and click on the “distribute horizontally” icon (see below).  Now the space between the points should be the same.  To find out more about the alignment tool, see Tav’s Align Chapter.

2 zigzag C.png

OK, now we have a very nice “zig” so let’s use it.  Select the Λ  and copy it to the clipboard (Edit -> Copy).  Select the path you drew for the tape.  From the top menu bar, click on Open -> Path Effects…  This will open a toolbox, called “Path Effects”, on the right side of the Inkscape window.

2-path-effects-menu.png

Click on the Plus sign (plus.png) in the “Path Effects” tool box. A list will pop up.  Scroll down the list and click on “Pattern Along Path” and click on the Add button below the list.

2-pattern-along-path-menu.png

Click on the “Link to path on clipboard” button (link.png).  Change the “Pattern copies” to “Repeated”.  Now you should see zigzags along the path.

2-link-to-zigzag.png

You can adjust the size of the zigzags by changing the original Λ.  Choose the Selection tool (select.png), click on the Λ and drag the corners of the dashed rectangle (scale.png) to make the Λ bigger or smaller.  If you hold down the Ctrl key while dragging the box, the width and height will scale proportionally.  You can also move the zigzags along the path (maybe you don’t like the way the zigzag looks at the bottom point of the heart) by changing the value of “Tangent offset”.   To learn about more tricks, take a look at Tav’s Pattern Along Path Chapter or the Floss manual .

4) Fine tune the zigzags

OK, you have played around with the Pattern along path and it is pretty good but you still want to change it a little bit.  As a last step, you can turn the pattern along path into an editable path object.  Using the selection tool, select the zigzag path and from the top menu choose Path -> Object to Path.  This will turn all of the little zigzags into a path with individual nodes.

3-object-to-path-e1511040052864.png

You can now edit individual nodes the same way we did in Step 2 above.

I didn’t like the way the zigzags became rounded so I went into the Edit Path by Nodes tool (edit nodes.png), selected all of the nodes (Ctrl A or drag a rectangle around everything) and clicked on the “Make selected nodes a corner” (corner.png) option (see A below). This made all of the lines straight.  I also dragged some of the nodes so that the different parts of the spiral would be connected together (see B below).

3 edit path

5) Create outline of zigzag

Finally, I wanted a curve along the inside and outside of the tape.  I drew this using the Bezier pen tool (Bezier.png) similar to what we did in Step 3.  I wanted the curve to lie exactly on the nodes of the zigzag so I used Inkscape’s snap to target feature which appears along the right side of Inkscape.  This feature has many options so I recommend reading up about it in Tav’s Snapping Chapter.  I used “Snap to cusp nodes”.

4 Draw outline.png

Once I had finished drawing with the pen tool, the curve was made of straight lines so it did not look nice and smooth.  To fix this, I used the Edit Path by Nodes tool (edit nodes.png), selected all of the nodes (Ctrl A or drag a rectangle around everything) and clicked on the “Make selected nodes smooth” (smooth.png) option

4 Smooth Outline.png

Now it’s your turn!

Tape.png

Additional notes:

There are many other ways to draw a path.  You can draw a shape and convert it to a path.  This is very useful if you want to combine circles (or parts of circles) with triangles, squares etc.  I recommend reading Tav’s Paths from Objects Chapter.

Instead of zigzags, you could also place dots along a path using the “Pattern along path” technique discussed in Step 3.  Just replace the Λ with a circle.  Notes: You will need to convert the circle to a path. You will need to set the “Spacing” parameter in the Path Effect Editor to create a gap between the dots.

dots.png


Filling a shape with a lace ground

star

Step 1) Create a patch of lace ground pattern

Create a rectangle of lace ground pattern that is bigger than shape.  For example, below I create a rectangle of rose ground that is 120mm by 120 mm.

Ground from template tool

Screenshot from Inkscape: Ground from template

Step 2) Group all of the little lines into one object

Select the entire rectangle by dragging your mouse to form a box around it.  Notice there is a little bar at the bottom of the window and it shows what you have selected.  In the picture below, I have selected 1536 little lines, each line is called a “path”. Each little line is surrounded by a thin black dashed box.

paths

All lines in ground selected

We need to group all of these little lines together so that we can treat them as one object.  To do this, select Object -> Group from the top menu of Inkscape.

group menu

Menu for grouping objects – keyboard shortcut is Ctrl+G

Notice that now there is just one thin black dashed box around all of the lines and the text at the bottom of the window says “Group”.

group

All 1536 lines are in one group

Step 3) Create the shape you want to fill

Create the shape that you want to fill in with the ground pattern.  In the example below, I have drawn a star using the “Stars and polygons” tool.  To learn more about drawing stars and other shapes, you can visit the following Inkscape tutorial: shapes tutorial.  NOTE: If you want to create a Gimp outline or a tape outline as I did above, you need to create a second copy of your shape.  You can do this using the copy and paste menus.

star.png

Create a shape such as a star

Step 4) Clip pattern to shape

Drag the shape on top of the ground pattern and position it so that the ground lines up with the shape exactly as you want it to.

position.png

Place shape on top of ground

Select both the shape and the group containing the ground pattern.  Now select Object -> Clip from the top menu.

clip menu.png

Object -> Clip -> Set menu

You will be left with just that part of the ground inside the outline as shown below.If this does not happen, there are a couple of things to check: 1) Make sure that you have grouped the ground pattern together as described in step 2.  2) Make the shape is ON TOP OF the ground pattern.  If the shape is behind, you can select the shape and press the “Home” key on the keyboard.  This should bring the shape to the top. 3) Make sure the shape is not grouped together with the ground pattern.

clipped.png

Rose ground clipped to star outline

Step 5) Outline the shape

Position the second copy of the shape around the pattern.  You can use the alignment tool to help make the alignment perfect (reference on how to use the alignment tool).

gimp.png

Second copy of star place around clipped ground

Step 6) Create a zigzag border

Several steps are required to create the zigzag tape so I will cover this in a separate blog post (Creating a tape).

Additional notes:

For more information about clipping a pattern to a shape,  try the following sources:

Windows: Updating the extensions

1) Download the latest version

On my Inkscape extensions page, locate the extensions.zip file (Step 2 on that page) and click on it to download.  The file is called extensions.zip and it is a compressed file.

download.png

Red box shows where to look for the link to extensions.zip file

2) Copy Location of Extensions

Launch Inkscape and go to the top level menu “Edit” -> “Preferences”. A window will pop up and you will probably have to drag the bottom right corner to resize it in order to see everything. On the left side, scroll down to “System” and click on it. On the right side, find “User extensions” and copy the text that appears in the white box beside this label (see below).

find location.png

3) Extract the files from extensions.zip

Open the explorer.png application and navigate to the downloaded extensions.zip file.  Select extensions.zip.  With the right mouse button, launch the file explorer menu and select “Open with” -> “Windows Explorer”.

open.png

This will list all the files in extensions.zip (see below).  At the top right of the window, there is an icon with the label “Extract All”.  Click on it.

extract all.png

This will launch a new dialog window called “Extract Compressed (Zipped) Folders.  Here, enter the name of the folder that you copied in Step 2 above.

extract location.png

Finally, click on the “Extract” button in the bottom right corner of the dialog window.  Close Inkscape if it is currently running.  Next time you open Inkscape, the updated extensions will be running.

Inkscape on Mac OS X

NOTE: As of Inkscape 1.0, these special instructions for Mac OS X are no longer required.

Installing Inkscape and using XQuartz

  • Inkscape does not run directly on the Mac OS X operating system.  It uses a go-between called XQuartz.  Nothing to be concerned about, but there are a few things you should be aware of.
  • To install Inkscape on Mac OS X, follow the instructions given here: Inkscape Extensions for Bobbin Lace.  NOTE: You will need to install XQuartz first and restart your computer as per the instructions in the link.
  • When you launch Inkscape on Mac OS X, you will see two applications start in your Application bar as shown below: Screen Shot 2017-10-30 at 2.44.57 PM.png
    The left one in the red box is for Inkscape and the right one is for XQuartz.  Inkscape runs “inside” the XQuartz application.
  • The top menus for Inkscape are a little different from what you are used to for applications on Mac OS X.  Instead of being at the very top of the screen, they are located at the top of the main Inkscape window.  The top of the screen will show the XQuartz menus and below that, in another window, you will see the Inkscape menus.Screen Shot 2017-10-30 at 2.49.25 PM.png
  • Where did it go?!?! If you minimize Inkscape, usually you can make it come back by clicking on the Inkscape icon in the application bar.  If this does not work, click on the XQuartz icon in the application bar and from the top menu of XQuartz select “Window -> YOUR DOCUMENT NAME – Inkscape.Screen Shot 2017-10-30 at 2.48.09 PM.png
  • As of Inkscape 0.92, the Inkscape keyboard shortcuts use Ctrl (^) instead of Cmd (⌘) as a modifier key for commands such as Copy (Ctrl  C) and Paste (Ctrl V).  Hopefully, this will be fixed in future releases.

Installing or Upgrading Extensions

  1. Download the file “extensions.zip” from Inkscape Extensions for Bobbin Lace.
  2. Launch Inkscape and go to the menu Edit -> Preferences.  A window will pop up and you will probably have to drag the bottom right corner to resize it in order to see everything.  On the left side, scroll down to “System” and click on it.  On the right side, find “User extensions” and copy the text that appears in the white box beside this label (see below).Screen Shot 2017-10-30 at 2.42.29 PM.png
  3. Launch the Finder application and in the top menu of Finder  select “Go” as shown below.  From the “Go” menu select “Go to Folder…”
    Screen Shot 2017-10-30 at 2.45.51 PM.png
  4. In the window that pops up, paste the path you saved in step 2 and click on the “Go” button.  Finder will take you to this folder location.Screen Shot 2017-10-30 at 2.46.10 PM.png
  5. Drag the files you downloaded in Step 1 into the folder you opened in Step 4.

Finding the path for Lace templates

  1. Download the “templates.zip” file from Inkscape Extension for Bobbin Lace Grounds and copy the files to a folder where you like to keep your lace documents.
  2. In Finder open the folder that contains the lace template files. Select the text (.txt) file for the template you want to use (NOTE: There is also a .png file with the same name.  Make sure you select the .txt file). For example, select the “rose.txt” file if you want to create some Rose ground.
  3. While holding down the OPTION key, click on the right mouse button to open the context menu for this file and select “Copy rose.txt as Pathname” as shown below.ALT-Option-Key-Mac.jpgosx-finder-copy-as-pathname.jpg
  4. In Inkscape, go to the Extensions top level menu and select Extensions -> Bobbin Lace -> Ground from Template.  A window will pop up as shown below.  In the white box to the right of the “File name for ground template (full path)” label, paste the path name you copied in Step 3.Screen Shot 2017-10-30 at 2.44.06 PM.png

Using the Clipboard

Because Inkscape uses XQuartz, the clipboard is a little different.

  1. You have set-up the clipboard on XQuartz correctly.  From the XQuartz menu at the top of your screen, select XQuartz -> Preferences.xquartz pref.png
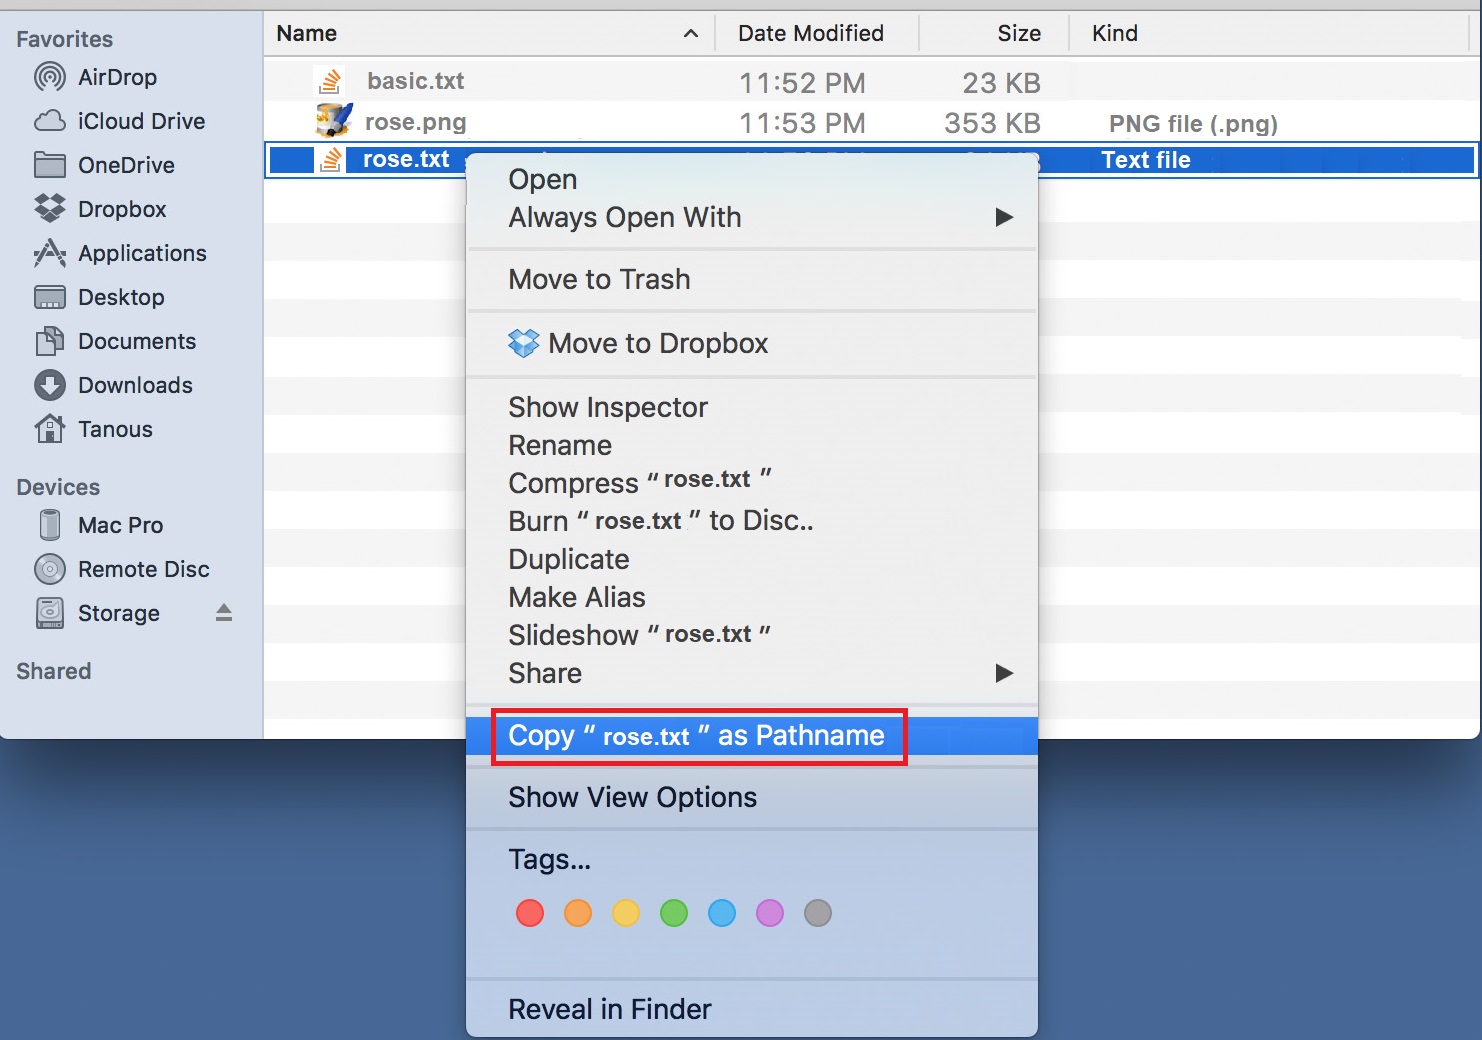
Make sure there is no checkbox beside the item “Update Pasteboard when CLIPBOARD changes”.xquartz_preferences.jpg
  2. As of Inkscape 0.92, the Inkscape keyboard shortcuts use Ctrl (^) instead of Cmd (⌘) as a modifier key for commands such as Copy (Ctrl  C) and Paste (Ctrl V).  Hopefully, this will be fixed in future releases.

Inkscape for Bobbin Lace

Note: These instructions have been updated for Inkscape 1.0

Inkscape is a free, open source drawing tool (inkscape.org).  I have created “extensions” to Inkscape that make it easier to create patterns with bobbin lace grounds.

You can find instructions on how to install Inkscape and my extensions on my web site: Inkscape Extension for Bobbin Lace Grounds.

In this blog, I will talk about how to use my extensions and also describe some of the many other features of Inkscape that bobbin lace designers might find useful.

How to use my Bobbin Lace extensions

When you start Inkscape, if the lace tool extensions are installed correctly you should see a menu called “Bobbin Lace” under the main “Extensions” menu. Under the “Bobbin Lace” menu you will see three options: “Circular Ground from Template…”, “Ground from Template…” and “Regular Grid…”.

Screenshot from Inkscape: Bobbin lace tool menu under Extensions

Screenshot from Inkscape: Bobbin lace tool menu under Extensions

The Bobbin Lace “Regular Grid” tool will allow you to draw a grid of dots. In the pop up dialog you can specify the angle of the grid, the distance between the footside pins and the size of rectangle you want to fill with dots. After you have selected the desired values, click on the “Apply” button.

Bobbin Lace Grid Dialog

Screenshot from Inkscape: Bobbin lace regular grid dialog

The distance between footside pins is the vertical measurement between two dots on the grid. When designing lace, you can use the handy reference by Brenda Paternoster to determine the size of your grid based on the size of your thread.

Drawing Lace Grounds

The Bobbin Lace “Ground from Template” tool will allow you to draw a lace ground pattern. Note: In the ground pattern, each line represents a pair of threads. In the pop up dialog you can specify the grid angle, distance between footside pins and the size of rectangle you want to fill with the ground pattern. You must also choose what type of ground to draw by giving the location and name of a template file.

Working with lace ground templates

First, download the “templates.zip” file from Inkscape Extension for Bobbin Lace Grounds and copy the files to a folder where you like to keep your lace documents.
The template files are in a zip file.  You will need to extract them from the zip file (also known as unzipping the zip file) and place them in a folder on your computer (unzip instructions for Windows, unzip instructions for Mac  – skip down the page to “Unzipping a File”).

The template file you downloaded has two different kinds of files inside it: 1) PNG files (file names that end in .png) which show a picture of a small sample of the ground pattern and 2) TXT files (file names that end in .txt) which contain a description of the pattern that can be read by the tool.

In the Ground from Template window, you need to tell the tool where to find the TXT file for the ground pattern you want to draw.  Click on the “…” button beside “Template file name” and select the template file. For example, in the picture below, the full path to the file rose.txt is shown.

Bobbin lace ground dialog

Screenshot from Inkscape: Bobbin lace ground dialog

Drawing lace grounds in a circle

The Bobbin Lace “Circular Ground from Template” tool will allow you to draw a lace ground pattern wrapped around a circle.  In the pop up dialog you can specify the inner radius of the circle, the number of copies of the pattern around the circle, number of rings and the grid angle. You must also choose what type of ground to draw by giving the location and name of a template file.

Bobbin lace circular ground dialog

Screenshot from Inkscape: Bobbin lace circular ground dialog